New functions from Dragon 8 upwards
The latest
functions available in Dragon NaturallySpeaking 15.x
(were also in versions 11-14) have been integrated
in the Workflow software, further enhancing productivity.
In particular, the
Roaming User and Delegated Correction functions improve the processing of
speech-recognized dictations. Correction and
playback are improved using the new DictaPad window.
-
 All typists who playback version 15.x (and similarly for 14, 13, etc.) dictations (.dra files)
must have the same Dragon version installed on their Player workstation and have access to
a trained user profile, normally the Roaming User from the author in the network.
The exception is when the Single-User mode is enabled on
Options / Speech Recognition.
All typists who playback version 15.x (and similarly for 14, 13, etc.) dictations (.dra files)
must have the same Dragon version installed on their Player workstation and have access to
a trained user profile, normally the Roaming User from the author in the network.
The exception is when the Single-User mode is enabled on
Options / Speech Recognition.
-
When installing Dragon for the typist, the setup wizard
offers the chance to create a New User.
Click on Cancel. A new user profile is
not required for accessing the Roaming User from authors.
Roaming
User (Speech profile in network)
Users can now
dictate at any workstation, with any dictation device, using a profile (i.e. your
speech files) stored in the network without needing to create new profiles of
perform additional training. You can use the same user information and
vocabulary, whether in the network or working away from the office using a
laptop. Management of the server profile is performed using the
Administrative Settings function in NaturallySpeaking.
-
This feature is also used to implement the
delegated correction by virtue of the fact that the typist can access any author's profile in the network.
When using server profiles, a Master profile is stored on a network drive. When a user is opened, a
copy is made locally and any changes to the speech files are made to this copy.
When the speech recognition is closed or another user loaded, all changes are
stored in the Master profile, available to all workstations.
Further details are available in the Dragon Help facility
under the topic "Dictating with a Roaming User - Administrative settings dialog
box".
Please follow these instructions to
activate a server profile:
1. Start Dragon NaturallySpeaking
from the Desktop shortcut or Windows Start menu
2. If the user is opened
automatically, then select "Close User" in the NaturallySpeaking menu.
If
the multi-user Open User dialog or New User Wizard is displayed then click on
Cancel.
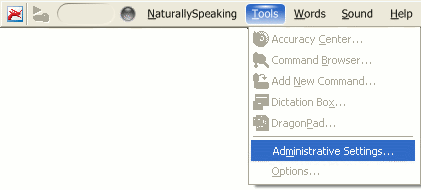
3. Select "Administrative
Settings" from the Tools menu
-
-
If this function
is grayed out, then check that no user is loaded.
4. Check the Enable option
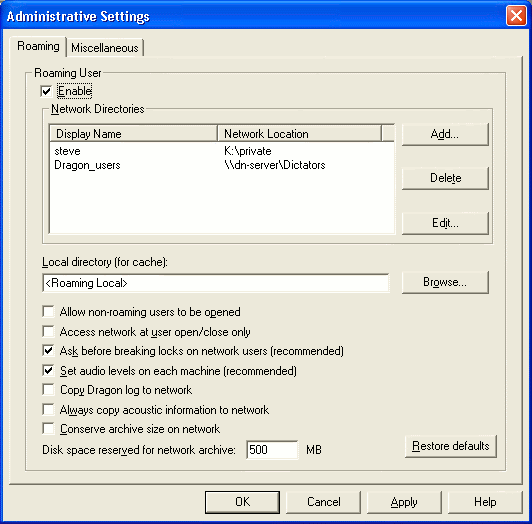
The server profile with these settings is now available.
How to set the location of the
server (master) profile:
You must set the location of the master profile at each
workstation from which you wish to work.
1. Click on the
Add button on
the Administrative Settings dialog, next to the "Network Directories" field
2. Click on Browse
and open the network folder in
which you want to store the profile. All workstations
should use exactly the same folder. Do not select any sub-folder
user names directly.
3. If no folder already
exists (i.e. by the first workstation to be set up), then create a new folder with an appropriate name
(e.g. "Dragon users") on a network
drive that is accessible to the users of the partaking workstations.
4. Assign
the roaming location a "Display Name" and confirm with OK.
-
Each user profile requires 20-1000 MB of storage on the server,
and about 20 - 200 MB for each local cache copy.
How to set the location of the
local user profile:
This is normally requested immediately after setting the
server profile and clicking on OK to save the
Administrative Settings. Confirm the suggested path
<Roaming Local> with a click on
Yes. A local copy
of the master profile will be
saved in this folder.
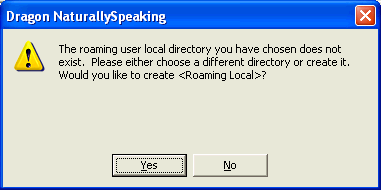
This is
used as a working copy (and also as a local copy when not in the network, e.g. for a
laptop) to provide a speech profile for a
particular user. If no folder is set manually, then the path is set automatically to a sub-folder named
after the Network Directory Display name in the
All Users area (which
is normally in C:\Documents and Settings\All Users\Application
Data\Nuance\NaturallySpeaking11\RoamingUsers\<display name>). The
user profiles are saved under the corresponding "Display name"
sub-folder.
-
You could set
the local folder
manually to a drive and folder on your PC using the
Browse button on the Administrative Settings dialog, next to the "Local
directory (for cache):" field. You must have
full access privileges to the folder.
How to save a user profile on the
server (for authors only):
When a new user is created by the
author, this is automatically saved in
the network path already set for the master profile and no manual
changes are necessary.
But if a local profile has been saved, or you have existing Dragon users,
then you must transfer these manually
to the server to become master
profiles.
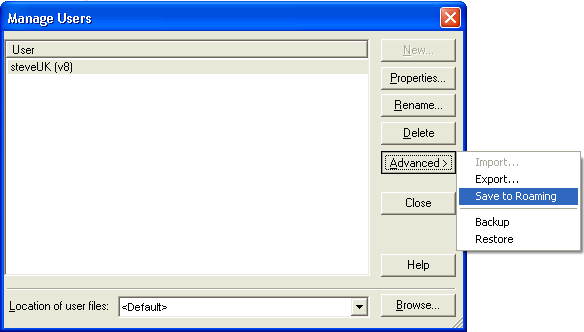
1. Open the "Manage Users" function in the NaturallySpeaking menu
2. You
must first have set the network
folder, then select the local folder using the <Default> option under "Location
of user files:"
3. Select the local user to be
copied, click on "Advanced" and then "Save to Roaming".
-
Advanced users only: If you want to load user profiles both locally and from the
network, then check the "Enable access to non-roaming users"
option under
Administrative Settings in the
Extras menu.
You can now close the Dragon toolbar using
Exit in the NaturallySpeaking
menu.
Repeat the above operations for all workstations where Dragon
is used, both authors and typists.
Delegated Correction
A Third Party, i.e. a typist, can correct and
improve the speech profile of any Roaming user. In other words, the author
delegates the correction of dictations and maintenance of his/her speech
profile to secretarial staff. The typist must have the full version of
Dragon NaturallySpeaking 8 or above installed on their workstation and
set the server profile to access the Roaming users
in the network.
The typist does not need to train or have their own user.
The typist loads the speech-recognized dictation
in Player and views
the text in the Correction window as usual.
The server profile of the corresponding author (as shown in the "BGSR ID"
column in the Workflow, when made visible)
will be
automatically selected and their
user speech files loaded, when
a dictation is opened.
-
The delegated
correction of Dragon dictations is completely different to the
previous method (called Single-user mode) of text editing via the keyboard. Instead, the Dragon
Correction/Spell function must be used so that the changes are used to update the
speech profile and improve future recognition.
-
Delegated
Correction in the Player is not possible if the
Single-user mode
was enabled at the Recorder workstation.
To perform the corrections, there are 4 possible methods:
1. Using the "Spell" dialog
box
2. Using the "Correct
that..."
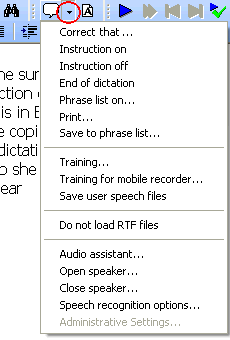
function in the Player command menu  (small speech-bubble symbol)
3. Using the "Correct
that..." function in the context menu (right mouse click).
4. Using a double-click on a
word to bring the Correction function, when the Dragon option is enabled
Correction using Spell dialog
This is the most convenient method for typists. If this done in
Recorder or word-processing, then 2 options in Dragon NaturallySpeaking must be set on the Correction tab in Options from the Tools menu in Dragon:
- "Correct" commands bring up the Spell
dialog box
- Automatic playback on correction.
Player will use these functions automatically, you do not need to set them.
The typist can move from word to word using the
[CTRL] + [Cursor arrow right/left]
key combination. Using the [SHIFT]
and [CTRL]
keys will select the corresponding
word(s).
When the typist selects some text
in this manner, the Spell dialog opens
immediately and the corresponding passage is played back. The correction
can then either be entered directly in the top text line, or selected from the
numbered alternatives
1 to 9 in the list below.
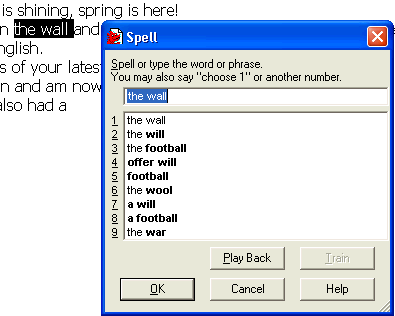
 Using
[ALT] + [number] on
the keyboard will select that alternative from the list.
Using
[ALT] + [number] on
the keyboard will select that alternative from the list.
Correction using "Correct that..."
The correction process is very similar to the Spell
dialog method apart from the
selection procedure. The
relevant section is selected using mouse or keyboard and then the "Correct
that..."
function started, either:
- from
the command menu (a little right from
the small speech-bubble symbol
in the Player function bar)
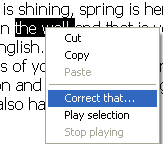
- or a right-click on the marked
text and then a normal left-click on the "Correct that..." function.
Using the
[-] hotkey on the numeric keypad
or [CTRL + K] will also
start the "Correct that" function.
Correction using double-click
The Dragon NaturallySpeaking option (Dragon bar: Tools
>> Options...) "Enable double-click to correct" on the
Correction tab must be enabled first for the user.
A double-click on a word or short phrase will bring the
Correction dialog.
-
The master profile is only updated when closing the user and
the question "Your user speech files have changed.
Save changes now" is answered with Yes.