 Options / Recorder Options / Recorder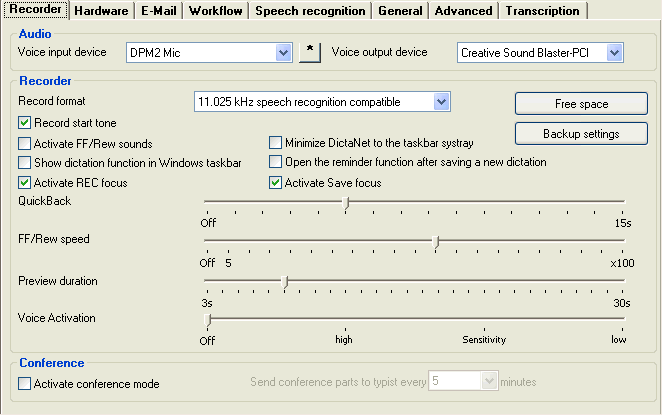
 Click on the above graphic for more information.
Voice input device
All recording devices in Windows System Settings - Control Panel - Sounds and Audio devices (multimedia) will be listed here.
Voice output device
All playback devices in Windows System Settings - Control Panel - Sounds and Audio devices (multimedia) will be listed here. Dictations will be played back in this selected device independently of other Windows sounds, music, error beeps etc. These other system sounds are always played back in the
Windows standard (preferred) device. Note that Dragon speech-recognized dictations (in multi-user mode) are always played back on the Windows standard device and this setting has no effect.
Unless you choose a custom setting, Recorder will select the standard (preferred) Windows Multimedia / Audio device.
If you have already selected a USB device, check that it is connected and switched on before starting Recorder, or else an error message will inform you that the standard Windows device will be used instead.
When a Philips DPM 9620/9600/9400i/9450 is used as a hand-held mike, then it can be dynamically connected when Recorder is already running but only if the corresponding USB audio device was pre-set using the  star button, right from the voice input/output devices .
Record Start tone
This function enables a "peep" tone whenever recording/inserting starts. It is recommended that this function is activated. A double-peep indicates end of recording.
Activate FF/Rew sounds
Activate this option if the normal fast forward / rewind noises of an analog voice recorder are required.
Show dictation function in Windows taskbar
When this option is activated an icon will be displayed in the taskbar that indicates to the author the recording status (Play, Record, Insert, Stop, Fast Forward / Rewind) of the Recorder. This allows the author to have the Recorder window in the background while documents are maximized in the foreground.
Minimize DictaNet to the taskbar systray
This will cause DictaNet to be displayed as a small icon bottom right in the Windows taskbar notification area (systray) instead of a large button in the taskbar, when the user minimizes the application. This saves valuable space in the main taskbar.
Open the reminder function after saving a new dictation
Only for RA-MICRO users in Germany at present.
Activate REC focus
When this option is active, pressing the REC key will bring Recorder immediately to the Windows foreground. When disabled, you can dictate with Recorder in the background, allowing you the whole screen to read reference documents.
Activate Save focus
When this option is active, pressing the Save/EOL key will bring Recorder immediately to the Windows foreground in order to enter dictation details. When disabled, Recorder remains in the background, but you can save the dictation without any details (File ref., Remarks etc) by pressing Save/EOL once more.
Activate conference mode
In conference mode, the dictation is saved automatically after a fixed time interval and recording continues without any time limit. After the next interval, the next part is saved in the current network dictation folder and so forth. The dictation is assigned a batch number and the sub-item number increments with each part saved. This is ideal for recording meetings and conferences where the transcription can start, using Player, even before the recording is finished. Note that a 'Conference' folder is always created for optional use instead of the regular dictation folders.
A conference mode recording can also be started spontaneously without setting this option using the combination of the [CTRL] key and the Record button.
The time counter is display in green
to indicate that the recording is not a regular dictation.
Note the Save menu is called before the conference recording starts, so that the relevant information is already available in the Workflow as the parts are saved.
On click
The time interval can be set to 5, 10, 15 minutes etc. To start a new part manually using the Save button instead of the time interval, select "on click" from the "Send conference parts to typist every..." setting.
To end the conference recording completely, use the Stop button first and then the Save button.
QuickBack
If this option is activated, a single, quick press on the Rewind key / button will cause the dictation to jump back a certain number of seconds, replay the last part of the dictation, and return to the same mode - recording or playing. Use this as an alternative to laborious rewinding. The user can set the number of seconds that should be rewound using the slider. Sliders are operated by left-clicking and dragging left or right.
This is very useful at the end of a dictation to check what was just recorded and immediately continue dictating. If you are at the very end of a dictation, then the Play key has the same function.
FF/Rew speed
Set the speed of continuous fast forward / rewind using this slider.
When the FF / Rew buttons (or hand-held mike keys / keyboard arrow keys) are pressed and held, the FF /Rew speed increases ("dynamic cueing"). The slider here sets the maximum dynamic cueing speed when winding through longer sections of dictation.
If the slider is to "Off", then a fast, linear operation is selected, without dynamic cueing. This means that the speed is constant and does not increase when cueing for longer periods. Pressing the keys for 2 seconds will rewind/FF about 1 minute of dictation. Ideal if you want the Recorder to respond in a similar way to your old cassette dictation machine.
Preview duration
This is part of the "IntroScan" function, which allows a preview of dictations in Dictation Overview or in the Import window. The setting must be between 3 and 30 seconds, default is 8.
Voice Activation
When this function is activated, a dictation is only recorded while the author speaks into the microphone, and not during pauses in speech. Use the slider to set the sensitivity level, taking into account the background noise level and sensitivity of the microphone.
The middle setting is standard. Select low sensitivity if background noise is particularly loud.
If syllables are repeatedly not being recorded, increase the sensitivity. If problems continue, deactivate the VoiceActivation function (uncheck the box) or set the threshold exactly as described below.
To set the threshold precisely, you could follow this procedure:
a) Make sure the background noise of your working environment is adequately low and maintains a common level during configuration.
b) Check the Voice Activation option and select the middle Sensitivity on the Recorder Options tab.
c) Under Windows Control Panel / Sounds and Audio - select the same audio recording device that you use in Recorder. Click on the Volume button for that recording device to start the input mixer panel. The name of the device (USB or soundcard) is shown at the bottom of the mixer panel.
d) Move the "microphone volume" slider to the very bottom (0). If using a soundcard which has an Advanced button for boost (20 dB gain pre-amplifier) then open this panel to check if the boost is set. You may need to disable it if the input level is too high.
e) Start recording by clicking the red record button; you must not speak right now! Just let it record background sounds.
f) Observe the blue, time-counter display in the recording window (top left) . it should remain at
00:00. Now move the "microphone volume" slider slowly upwards.
g) When the indicator starts counting, regulate the slider a little downwards again until counting stops.
h) Now you have found the correct microphone sensitivity (threshold) for your working environment and "Voice Activation" is configured properly.
i) You could select "High" or "Low" sensitivity in Recorder Options if your environment changes later, e.g. when the office window is open to a busy street.
This is NOT recommended for users of Dragon NaturallySpeaking 7 (or other) Speech Recognition software. This older version Dragon must set its own mic. level for optimal recognition.
.