Import
Import
Import
The Import View allows you to import audio files from mobile voice recorders into the Dictation Manager. This is identical for Recorder and Player.
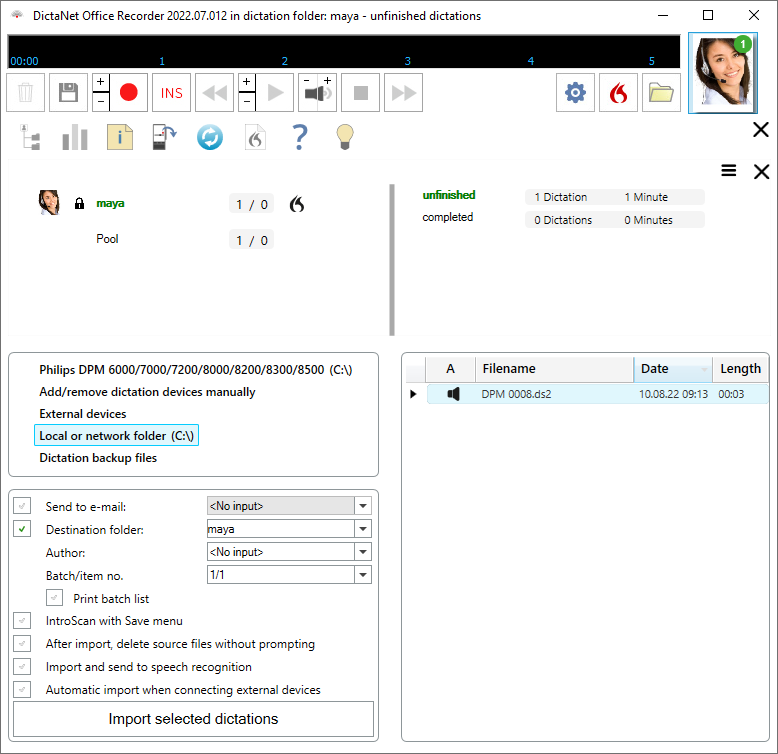
 Click on a part of the above graphic to find out more.
1. Select the folder into which files are to be imported via the Dictation Directory or the Statistics/Graphic View.
2. Click the Import button. The selected folder is still shown above, marked in blue.
3. Choose the data source from which the files will be imported (i.e. a named device, "other external Devices", "Local- or Net- drive", "Dictation backup files") on the left side of the display.
The last 99 backups of recorded or imported dictations are listed and can be previewed before being imported. The path to the local backup folder is pre-set on the Options / Workflow tab.
Only external named devices that have been configured via will be shown.
The specific software for the voice recorder must also be installed. Always use the corresponding data source (i.e. select the line on the left of the display) for a named device, e.g. Philips DPM or Grundig Digta.
Any removable disks or offline devices that are not currently connected or their path defined, will be shown in
orange text
as "not found".
4. Set the exact data path by selecting an import device or drive and then navigating through the file structure to the files that will be imported. Selecting a path only needs to be performed once for each data source. This should occur automatically the first time it is used.
5. Contents of the data source is shown on the right side of the display. Select a dictation to be imported by left-clicking on the small, gray rectangle to the left of the dictation filename. Your selection is shown in
dark blue
.
 Use [Ctrl + left-click] to add individual dictation files to the selection. Use [Shift + left-click] to add blocks of files.
6. Finally, confirm your selection by clicking on the button with the large, green check symbol  . All dictations will be converted and saved into the current dictation folder. A progress bar shows when the process is complete.
More details
Send to
e-mail
If you want to forward all imported dictations to an e-mail address, then enter the address here. Previously entered addresses are available in the drop-down list.
These dictations will be shown in the Dictation Overview with an envelope symbol.
Send to folder
If you want to save imported dictations in another folder, not the currently active one, you can enter it here.
Preview selected dictations
To decide if a dictation should be imported, it can first be previewed. Selected the dictation, right-click and select the menu option "Preview of selected Dictations."

Automatic download from external devices
If you want dictations from mobile voice recorders to be imported automatically when connected, without needing to open the Import View, then check this option.
Introscan with
Save Menu
This useful function, when activated, allows you to listen to the introduction of a dictation, then add details (File ref., priority, remarks etc) to an imported dictation in the Save/EOL Menu before it is saved (using the floppy diskette symbol) in the dictation folder. The red cross button will cancel the IntroScan of following dictations.

IntroScan Preview time can be set on the Options / Recorder (or Player) tab.
If the "
After import, delete source files without prompting
" option is checked, the imported files will be deleted from the source folder without any pop-up message asking for a confirmation of the delete.
Author
The initials of the author (person who recorded the dictation) can be selected from a list of the last entries used. Standard user is set on the Options / Advanced tab.
Batch/item no.
The batch number and sub-item number can be entered here. A list of the dictations imported in a batch can be printed out. More details can be found in the Save Menu help.
Always check the device from which you want to import on the Options / Hardware tab under Premium voice recorders before attempting to configure or use the import function.

 Importing external or local files
Click on the option "other external Devices" to import files from any mobile recorder which is not listed as a Premium Voice Recorder, or on the option "Local- or Net-drive" to import from the local computer's hard drive, CD-ROM or a network drive.
DSS, MP3, Wav 16bit, AMR and VMO files are supported.
Note that Windows 2000 must have SP3 or higher to support Removable Disks/drives. Always use the green-arrow icon on the system bar, "Unplug or Eject hardware", before disconnecting the device. This will avoid any file management problems.
 DictaNet mobile voice recorder DVR-3500
Connect the device via USB; it will appear as a new Removable Disk with a letter (e.g. E: or F:) in My Computer. The USB-connection is detected automatically and the Import View opened. Click on the device and set the path to the correct removable drive letter, the first time this device is used. The dictations in folders [A] and [B] will be listed for import or preview. The imported files are presently not speech-recognition compatible.
The dictations in the device are in .df format and will be converted to .wav when imported.
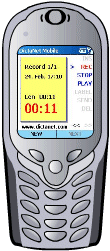 Smartphone or Pocket PC with DictaNet Mobile
Any approved cell-phone with Windows Mobile for Smartphone, or Pocket PC, and approved for the DictaNet Mobile application can be connected via USB or Bluetooth and the dictations imported via ActiveSync. Select the Smartphone on the Options / Hardware tab. When correctly connected, it is automatically detected and the dictations displayed, ready for preview/import.
Please install Microsoft ActiveSync version 4.2 or above (Windows Mobile Device
Center 6.x for Vista)
and configure for a Guest partnership.
Apple iPhone or iTouch with DictaNet Mobile Recorder
Import is over your WLAN access point (router) or can be direct to a PC with an ad-hoc WLAN connection. The iPhone and your PC must be connected to the WLAN in the same segment. The DictaNet "iPhone Sync" program (iPhoneSync.exe) must be allowed through any firewall as an exception. Use the Synchronize feature in the iPhone Mobile Recorder software to select the PC (DictaNet user initials are shown) which is running with the iPhone option enabled on the Hardware tab.
Dictations can be sent from within the app over Apple Mail and these can be imported into DictaNet on the PC.
If the iPhone or iTouch v3 has an internet connection and has been connected to your office network via VPN (Virtual Private Network) then you can transfer files directly to the office from any remote location. Enter the local IP-address of the remote PC (which is running iPhone Sync or DictaNet WF) at the bottom of the Synchronize dialog. It must be in the same segment as the VPN-gateway. This PC will then be displayed and you can select it before synchronizing.
The dictations (in WAV format) are transferred to a local folder on the PC, by default in the local dictation directory, when the Start button in the iPhone recorder software is pressed and then the original files are deleted from the iPhone. The files are then moved from this folder automatically to the network dictation directory. Attached JPG photos, dictation subject, priority, author initials and any Dragon speech recognition username are also transferred to the workflow. Photos will be shown under the "Photo" column in the dictation overview and will be automatically opened with the dictation. Or simply click on the symbol to open the picture without opening the dictation.
BlackBerry with Thax Findentity Dictate software
Import from the device is possible over USB cable (device is a removable disk) and the path to the device drive letter must be set once for the import-source. The default folder is \BlackBerry\Findentity. Dictations can also be mailed from the device using BIS or BES, but recordings longer than 30s require BlackBerry OS version 4.5 or above. Information such as File number, Author, Typist, Priority, Remark (Additional information) and Col 1 (Profile) will also be transferred to the workflow, when they are set in the "Findentity Dictate" software. The Priority values must be preset to the exact text-strings "Deadline", "High", "Normal" or "Urgent" in the device under Menu >> Default parameters.
If dictations are transferred by e-mail or card-reader, then the accompanying AMR.ini file must be in the same folder, in order to transfer the supplementary information.
 Olympus DS-
5000, DS-4000,
DS-3300, DS-2300
Olympus DS-
5000, DS-4000,
DS-3300, DS-2300
Connect the device via USB; it will appear as a new Removable Disk with a letter (e.g. E: or F:) in My Computer. You will be prompted to select the path to this drive the first time this device is used. The USB-connection is automatically detected and the Import View opened. The dictations will be listed for import or preview. The imported files are speech-recognition compatible.
Files recorded in HQ or SHQ format from the DS-2200 are not compatible and should be converted from .wma to .wav format using the Olympus DSS Player software before importing.
, DS-2000 Olympus DS-3000 and DS-330/660
Once the manufacturer's "DSS Player" software has been installed from CD-ROM and the device connected via USB, it will be possible to select this device in Import View. Dictations can then be imported out of individual folders. The USB-connection is automatically detected and the Import View opened. The imported files are speech-recognition compatible.
If dictations cannot be viewed or the "Disconnected..." message is repeatedly shown in the progress indicator above, then disable the Auto-start of the DSS Player in the Olympus Device Detector program  , located down-right in the Windows taskbar.
If no dictations are stored in the device, then the data source (i.e. the "Olympus.." line on the left of the display) will not be shown.
Please note that the Long Play (LP) mode of the Olympus devices is not currently supported and cannot be directly imported. You could use the Olympus DSS Player software to convert to .wav PCM format before importing.
Grundig DIGTA
/ Dictaphone Walkabout 5210
/5215
The Grundig DIGTA StenoTrans, or Dictaphone Transfer, software should be installed on the computer before importing dictations into DictaNet. DIGTA includes the models 4010, 4015-DS, 410, 415 and DigtaSonic 420.
Connect the device via USB; it will appear as a new Removable Disk with a letter (e.g. E: or F:) in My Computer. Click on the device and select the DSS folder on this new drive, the first time this device is used. Dictations can now be imported into the Workflow by clicking on the Grundig DIGTA entry in Import View. The dictations will be listed for import or preview. The imported files are speech-recognition compatible.
Important: While recording on the DIGTA, do not use the VoiceActivation function, as the resulting dictations cannot be converted to .wav format for use in speech recognition.
The DigtaMobile software can be used to program the device with specific fields which will be imported into the Workflow. Use the "General - Users" and "Accompanying Note" functions to send the Author name to the device. Other fields, such as "Transcriber", "Priority", "Dictation Type" and "Group" can be changed in this software and the information imported into the Workflow.
 Philips DPM
96x0 / 95x0 / 9400i / 9450VC / 9380 / 9370 / 9360 / 9350 / 9250
/ 9220
Philips DPM
96x0 / 95x0 / 9400i / 9450VC / 9380 / 9370 / 9360 / 9350 / 9250
/ 9220
The DictaNet - Philips Pocket Memo or Philips DPM Control driver software must be installed on the computer before importing dictations into the Workflow. This is an additional software available on the DictaNet Service web-page. Please consult your Sales Partner. Long Play mode dictations (LP) are supported.
Connect the device via USB; it will appear as a new Removable Disk with a letter (e.g. E: or F:) in My Computer. The USB-connection is automatically detected and the Import View opened. Click on the device and set the path to the correct removable drive letter, the first time this device is used. The dictations will be listed for import or preview. The imported files are speech-recognition compatible.
Voice Command in Philips Digital Pocket Memo
96x0/95x0/9450VC
The 96x0, 95x0 and 9450VC support up to 5 Keywords of user-defined information; entered through Voice Command or selected from a menu list. This can only be programmed with the Philips "SpeechExec pro Dictate" software on the PC. Please consult your DPM Instruction Manual for full details. These Keywords can be used to import dictation details into the Workflow. The procedure to set-up this facility is as follows:
Method 1. No Usage descriptions are assigned to the Keywords in the device - they are then automatically allocated to these 5 pre-defined columns in the Workflow:
Keyword 1 - File Keyword 3- Priority Keyword 3 - Remarks Keyword 4 - Col 1 Keyword 5 - Col 2
If you also require the Author initials then please use the setting in the Import View.
Method 2. Usage (and Content) descriptions are assigned to the Keywords - they must be exactly the column names given below:
File, Priority, Remarks, Col 1, Col 2, Author, Typist, BGSRID
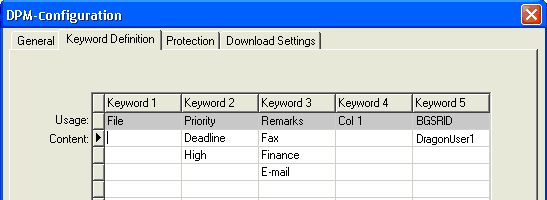
The order of Keywords is irrelevant. At present, no other columns can be used. A maximum of 5 Keywords can be setup from the 8 possible column names given above.
The Content of the "Priority" Keyword must be either "Deadline", "High", "Normal" or " ---".
The column names are limited to 15 characters.
BGSRID can be used to send dictations to the Background Speech Recognition for the corresponding user speech profile.
The Sanyo components "USBDriver" and "LDADPCM" must first be installed from the Sanyo "PC Memo Scriber" CD-ROM. Connect the device via USB; it will appear as a new Removable Disk with a letter (e.g. E: or F:) in My Computer.
Click on the device and select the VOICEREC folder on this new drive. Dictations can now be imported into the Workflow by clicking on the Sanyo entry in Import View. The dictations will be listed for import or preview.
The imported files in ADPCM 4-bit format and therefore are presently NOT speech-recognition compatible.
 Siemens SL 45
Dictations can be imported via a USB Card Reader. Click on the Siemens SL 45 entry in Import View to list the dictations for Import and / or preview.
Dictations can also be imported using the docking station. When the docking station and SL 45 are connected to your computer, the files will be available in the "Voice Memo" sub-folder of the "Mobile" drive. The audio format is .VMO.
This drive cannot currently be accessed directly from Import View; dictations must first be copied to a local folder (one can be created for this purpose). Select this folder in Import View and click on the Siemens SL 45 entry. Select a path to this local folder. The dictations will be listed for Import and / or preview.
Philips Pocket Memo 9300 (older obsolete device - not a removable disk)
First install the Philips DPM Download/Configuration V1.0 software (from the Philips CD-ROM) and set a path to a local folder where the dictations will be temporarily stored. Connect the device to the computer via USB. Use the DL/S button on the device to transfer the dictations to this folder.
Click on the Philips Pocket Memo 9300 device in the Import View and set the path to the same folder as previously selected in the Philips Download application. Dictations can now be imported into the Dictation Manager.
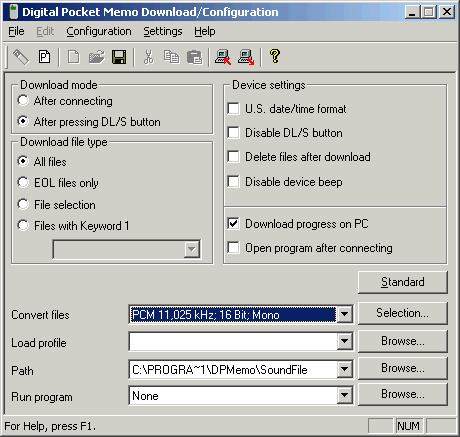
Open the Pocket Memo configuration menu (advanced) and choose the hard drive directory path and set the conversion format to PCM 11.025 kHz; 16 Bit; Mono; this will allow the dictations to be imported into the Workflow and sent for speech recognition.
The dictations are recorded using a proprietary Sycom sx7396p.acm codec. If the dictations are not converted to PCM, then only PCs with the Philips DPM Download/Configuration V1.0 software installed can play back the unconverted .wav files.
 DictaDect
Click on the DictaDect entry in Import view to access the dictations on this device. The dictations will be listed for import or preview.
To import dictations from other voice recorders (e.g. SANYO ICR-B100, SONY ICD-BM1, SONY ICD-MX20, SONY ICD-MS1, SONY ICD-BP100) the dictation files must first be transferred to the computer's hard drive using the manufacturer's software, and then converted to a .wav file (see the manual for the device for more information). We recommend PCM 11.025 kHz; 16 Bit mono format.
Once this has been done, open the DictaNet Import view and select the voice recorder. Check that a file path has been chosen. The dictations will be listed for import or preview.
If using Sony "Digital Voice Editor" software, set the codec to PCM (Tool -Options menu) and 16kHz and then use the Convert function to save to a .wav file.
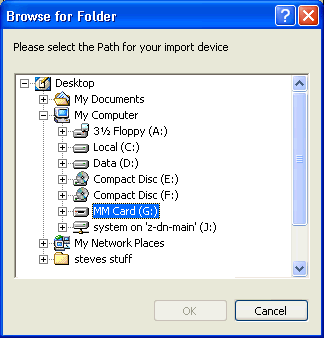
Right-click on a device or drive listed in Import View to select the menu option "Path to external device". Then browse through the file structure to the desired device (USB devices must be connected!) and its folder where the dictations are stored, then select it (marked in blue) and click . The path selected will be shown as a tool-tip when the mouse is over that data source.