 Speech Recognition
Speech Recognition
Speech Recognition
DictaNet is recommended to be used with version 15.x of Dragon NaturallySpeaking speech recognition software. The previous versions 13 and 14 are also supported. Use this help page in conjunction with Dragon's own documentation. To use speech recognition software with other programs, e.g. MS Word, check for compatibility in both Dragon's and the program's documentation.
In the Recorder click on the large speech-bubble symbol  top right to begin speech recognition.
 Under
you can configure the speech recognition program to be automatically started with the DictaNet Recorder.
Under
you can configure the speech recognition program to be automatically started with the DictaNet Recorder.
Online-recognition takes place while the dictation is being recorded, displaying text on the screen just moments after it is spoken, in the DictaNet Dictation Window.
Background Speech Recognition takes place after a dictation has been recorded or imported and then saved. You must select which user profile will be used for the transcription in the BGSR ID Column in the dictation overview.
With both types of speech recognition the typist receives the audio file as well as a text.
Once Speech Recognition has been loaded into the Dictation Window and the microphone turned on, a small, yellow window  appears in the top left of the screen. This is the "result box".
Wait until the result box is visible before beginning the dictation.
Use the speech commands "Wake up" and "Go to sleep" to turn the microphone on and off during recognition.
Do not turn the microphone off before all the dictated text has appeared in the dictation window.
Interrupting Online-Recognition
You can interrupt a dictation which is undergoing Online-Recognition in the Dictation Window. You do not have to close and save it. An example situation would be: you are dictating the text of a complex contract when the telephone rings. The telephone discussion is about a different matter, and when it is finished you want to dictate a quick file note about it, but the Recorder is blocked with the text of the contract.
In this case do the following:
- Click on the large Speech Bubble symbol to close the Dictation Window and interrupt the contract dictation. In the Recorder Progress Display the message
Please wait...
appears and the position indicator shows 00:00 for minutes and seconds.
- Click the Record button and record the dictation for the file note concerning the telephone conversation. Notice that the time counter top-left is running. You must save this active file note by clicking Save before you return to speech recognition.
- Click again on the Speech Bubble symbol and click the Record button to return to Online-Recognition. Once the Results Box appears top left, speak to continue recording the contract text. New text will be added at the current cursor position.
Dragon speech-recognition software has its own help files; right click on the red microphone icon in the Windows taskbar (bottom right) and select the menu option "Help/ Help topics". You could also start the Dragon "Tutorial".
Clicking the Save button  brings the Save menu to enter relevant details and saves the speech-recognized dictation in the Dictation Directory. You could also click on the New Document symbol
  .
.
Use the speech commands "End of dictation" or "Dictation off" to save the speech-recognized dictation and add Dictation details.
After recording a speech-recognized dictation, Save/OL will open a window in which dictation details can be saved. Dictation details can be entered using the mouse or the keyboard. Finally, save the dictation and its details with Save again, or the floppy-disk Save button  , and then you are ready for the next dictation.
Enter a filename for the dictation in the File field (e.g. a case/matter number). Optionally, the File field in the Dictation Manager can be renamed - this will also change the name of the field in the Save Menu.
 To move to the next field use the [Enter] or [Tab] key.
A Philips barcode reader can be used to input a case number
In the field
Deadline
enter the deadline for the dictation to be typed up. Choose the correct month using the arrow buttons at the top of the dropdown calendar, and then click on a day to select it.
Use [Alt+ down arrow] to open the dropdown calendar. Use the arrow keys within the calendar to select the day, month and year.
The default deadline can also be set via
Assign a priority to the dictation using the Radio Buttons  in the "Priority" column of Dictation Manager.
 High
.
High
.
 Deadline
.
Deadline
.
Urgent message
Blocked
The buttons can be used to select Radio Buttons. Move between fields using the [Enter]- or [Tab]-keys.
To
Save
the dictation with accompanying dictation details using the keyboard, use the [Enter] key several times.
Alternatively, left-click on the Save button. The dictation will be saved in Dictation Manager and an additional, local backup will be made.
Click on the menu arrow to the right of the small speech-bubble symbol to obtain the functions shown below:
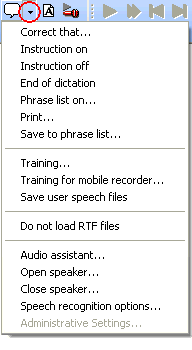
Many of these are standard Dragon utilities and are explained in the Dragon Help files.
The Author can import and train words using the Accuracy Center in the Dragon Tools menu. The Author should select the "Add a list of words" option in the Accuracy Center, press [Next] until a dialog lets you browse to the file and the button "Add words from list" can be clicked.
Microphone volume level is set using the "Audio assistant", this calls the Dragon Accuracy Center "Check your audio settings" facility.
Special Speech Commands can be used during Online Speech Recognition to activate various DictaNet dictation modes or functions. The commands are also in the Recorder command menu. Say the command using the exact text used in the menu. Detailed explanation is found in DictaNet Commands.
These commands can be acknowledged with a roger beep if required, so that you can dictate without needing to check the screen for mode changes.
To do this, add this line to the Dictapad.cfg text file which is located in the Windows user's folder C:\Documents and Settings\<User-name>\Application Data\DictaNet :
BeepOnVoiceCommand=1
Commands supported with the 'roger' beep are:
"Instruction on" / "Instruction off"
"Phrase list on" / "Show Phrase list" / "Take phrase"
"Save to phrase list" / "Save phrase list" / "Save phrase"
"End of dictation" / "Dictation off" / "E O L"
"Microphone off"
"Font-name" type
"Font-size" xx
"Bold that" / "Bold on" / "Bold off"
"Italicize that" / "Italicize on" / "Italicize off" / "Italics on" / "Italics off"
"Underline that" / "Underline on" / "Underline off"
"Strike through on" / "Strike through off" / "Strike out on" / "Strike out off"
"Strike through that" / "Strike out that"
"Left align that"
"Center that"
"Right align that"
"Justify that" / "Full align"
... and other formatting commands for selected text.